
Published on: July 3, 2019
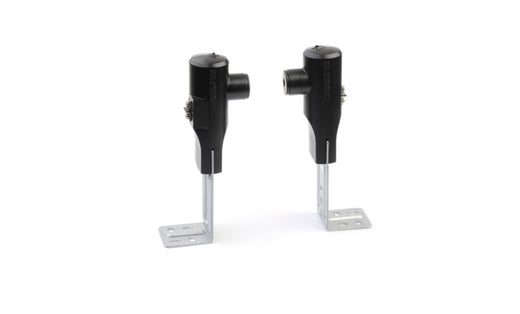
The garage door safety sensors are designed to ensure maximum safety for your garage door opener operation. The Genie garage door safety sensor kit (Safe-T-Beams) uses an invisible infrared beam across the opening of the door, the system detects any object passing through the infrared beam of light and automatically reverses the closing garage door. The Genie Safe-T-Beam system is required by US Law as of 1993.
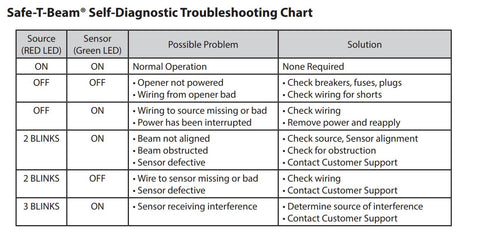
However, the Genie Safe-T-Beam kit is self-diagnostic. If there is an issue or obstruction there is a series of garage door opener light flashes or small lights on the safety sensors to let you know what the issue could be (see chart below). If you are experiencing a garage door that will not close and a blinking garage door opener light you may have an obstruction of the Safe-T-Beam infrared light. If there is no physical obstruction you may have light interference. If the sun or another bright source of light shines into the garage door safety sensor lens it can cause a false positive and reverse the garage door. This can be a nuisance but good news, there is an easy fix available.
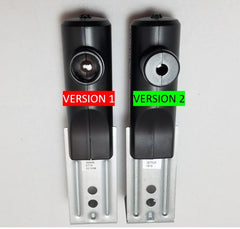
The Genie Version 2, Safe-T-Beam system (Model GSTB-R) has a lens cover that protects from alternative light interference, as seen in the picture below. This updated version should eliminate any false positive safety sensor signals. This is a very easy upgrade to your existing Genie garage door opener that should only take a few minutes to install. You can reuse your existing wiring and mounting locations. You simply remove the wires from the current Safe-T-Beam sensors and unscrew them from the wall. Then reconnect the wires and remount to the wall. The garage door safety sensor beams should still be lined up. If not loosen the mounting to the wall slightly and realign them by hand until both the red and green lights are on both sensors (one each on the left and right sensors themselves).
If an operating problem continues and you cannot close your door you can disconnect your Safe-T-Beams from the operator and hold down the wall control button until the door closes (remote and wireless keypad will not work without Safe-T-Beams).
You have just successfully upgraded your Genie Safe-T-Beam system!
86 comments
@Monte Horn – The best way to test the Safe-T-Beams will be to try to override the Safe-T-Beams with the wall console. The door should close if you press and hold the wall console continuously. If this works, then the issue may be the wiring or the Safe-T-Beams. If it does not, then it could be the circuit board. For troubleshooting assistance please contact our customer service at 1-800-354-3643 for assistance.
My opener is less than 5 years old. All of a sudden my door went up but would not come down. I checked and both my sensors show no light. I have power to the unit. My sensors don’t flash to tell me if one is bad. What is the best way to troubleshoot if one or both sensors are bad. I know how to use a volt/ohm meter. If I touch the leads going to the sensor and have power shouldn’t that indicate a bad sensor. Thanks
@Rick Guill – No, you cannot add more than one pair of Safe-T-Beams to a garage door opener.
Can more than one set of safety sensors be installed on a door? For example, can one set of sensors be installed at 6 inches from the floor and one set at 36 inches from the floor. I am trying to ensure that the car is pulled in far enough to clear the door. Thanks
Can safety sensors be installed in a Genie Pro 82?