
Emergency Release Kit Installation Instructions
PDF Installation Instructions for the GER-R Genie Emergency Release Kit
EMERGENCY RELEASE KIT MODEL GER-R INSTALLATION
WARNING: To prevent serious injury or death Disconnect power to garage door opener before performing this installation.
Operation Information:
The Emergency Release Kit is designed to provide access to your garage from the outside in the event of an electrical power failure and no other means of entry is available. The Emergency Release Kit is designed for use with standard-type garage doors and garage door openers. If any modifications were required to your garage door(s) or garage door opener(s) at the time of installation, the length of cable supplied may not be adequate and additional cable will have to be purchased locally. Genie Brand production model openers are shown for illustration purposes and may not depict your type of opener connection point. Inspect your particular model and brand of the opener before performing this installation to ensure that this product will safely operate your release system.
Determine Door Type:
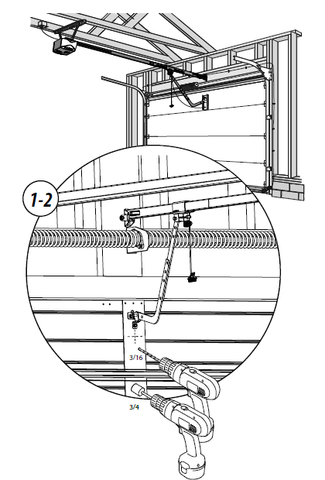
SECTIONAL DOORS
The lock assembly is generally installed in the top door section directly beneath the door opener carriage release mechanism.
ONE-PIECE DOORS
The lock assembly must be installed approximately midway between the top and bottom of the garage door and directly beneath the door opener carriage release mechanism.
INSTALLATION:
1. Drill a 3/16” pilot hole through the garage door where you plan to position the center of the lock assembly.
2. At this pilot hole, drill a 3/4” hole about half way through the door–follow this by drilling a 3/4” hole from the inside of the door to finish the hole completely through the door. (This procedure eliminates any chipping on wooden doors.)
3. Insert the lock assembly and use it as a template for determining the location of the mounting bolt holes.
4. Drill 3/16” holes through the door at these two points.
5. Insert bolts and apply flat washers and nuts and tighten securely.
6. Feed cable and hook through the uppermost hole in the door arm. (Belt & Chain Channel models only)
7. Feed “S” hook into hole in carriage release that the Emergency Release Cord is attached.
8. Crimp “S” hook with pliers to secure. Do not crush plastic release handle.
* Tube rail models require a modification to the carriage release mechanism. See owners manual for required changes.


USING THE EMERGENCY RELEASE KIT:
1. Insert the key, turn it 1/2 turn and remove the entire inside lock assembly. This allows access to the cable, which is connected to the carriage release device on your door opener.
2. Pull out on cable/cylinder to disengage the carriage release allowing manual operation of the garage door.
3. Replace the cable and lock assembly after disconnecting the carriage by inserting it into the housing and turning the key 1/2 turn to the locked position and remove the key.
4. Manually open the door.
5. Reconnect the door opener carriage release device as per manufacturer’s instructions.
-

Genie Garage Door Opener Replacement Parts
Common Garage Door Problems & the Parts That Fix Them Door won’t...
-

Accessories
[split] Find the right accessories for your garage door opener: The Genie...
-

Smart Device Compatible
Smart Device Compatible Garage "Can I make my garage door opener smart?"...


