
G3T - 3 Button Remote Programming Instructions
G3T Remote Programming Video Instructions
PDF Printable Programming Instructions for the G3T-R remote
G3T-R or G3T-BX 3-Button Intellicode Remote Programming Instructions
If your Genie garage door opener remote is not working, it may need to be reprogrammed. Follow the instructions below to reprogram the Genie remote just like when it was new, even if it worked before.

1- Putting the Garage Door Opener into Programming Mode
New Genie® Garage Door Openers

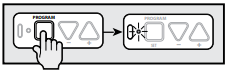
1. Press and hold the program button until the round LED turns blue, then release.
2. The small round LED light will go out and the long LED will begin flashing purple.

Proceed to step 2.
-OR-
Genie® Openers and External Add On Receivers that were Manufactured between 1995 to 2011

1. Locate the Genie garage door opener learn button. Press & Release the Learn Code button once. The red LED will begin to flash.
Proceed to step 2.
2- Programming the (G3T) 3-Button Remote to your Garage Door Opener
NOTE: Once in programming mode, you will have approximately 30 seconds to perform this step
1. Pull the protective battery tab from the remote.

Note: While programming remote buttons, stand at least 5 feet away from the opener. This ensures you have proper communication between the remote and the opener.
2. Slowly press and release the remote button of your choice two times. The opener LEDs will flash and go off, indicating you have successfully programmed your remote.

3. Press and release the same button a third time and door will open or close. It is possible to press the remote button too quickly or lightly. If the LEDs do not go OFF, press the remote button several more times to achieve confirmation.
3- Lost or Stolen Remote/Erasing all Remotes
Newer Genie® Garage Door Openers
1. Press and hold the program button until the round LED turns blue, then release.
2. Press and hold the Up(+) Down (-) buttons at the same time, until both LEDs turn solid blue, then release.

Genie® Garage Door Openers and External Receivers Manufactured between 1995 to 2011
• To erase all of the remote devices from other types of Genie® garage door openers, Press and hold the Learn Code Button until the LED stops blinking.
Start at step 1 to reprogram your remotes.
NOTE: Clearing remote control memory from the power head will clear ALL programmed remotes and keypads. Your opener will no longer recognize any signal from any remote device, including a missing remote device.
4- Replacing the remote battery
Replace the G3T remote battery with CR2032 coin cell battery.
1. Open the remote case using a washer or coin that fits into the slot at the top of the remote.

2. Replace the battery. Match battery polarity symbols inside the battery housing.
3. Align components and snap case closed.
NOTE: For openers manufactured between 1995-1997, use the two upper buttons on the remote. Made after 1997? Use any button for programming.


-

Genie Garage Door Opener Replacement Parts
Common Garage Door Problems & the Parts That Fix Them Door won’t...
-

Accessories
[split] Find the right accessories for your garage door opener: The Genie...
-

Smart Device Compatible
Smart Device Compatible Garage "Can I make my garage door opener smart?"...


