

The Genie Company
Screw Drive Coupler Assembly - 36645R.S
Screw Drive Coupler Assembly - 36645R.S
Couldn't load pickup availability
The coupler assembly connects the garage door opener motor to the screw drive rail assembly. If the motor on your garage door opener is running, but the screw is not turning, it is most likely time to replace the screw drive coupler with this replacement. If you glance up at the rail when you press the garage door opener button, you will be able to hear the motor run and see if the screw that is inside the rail is turning.Â
- The coupler is designed to protect the screw drive and motor from wear and tear
- Genuine Genie replacement partÂ
- Compatible with Models 2562, 2564, 2568, 3062, 3064, 4062, 4064, Powerlift 900, GPower 900, PowerMax 1200, TriloG 1200, Excelerator 1000, Excelerator II, PowerMax 1500, MachForce, MachForce Connect, TriloG 1500
SKU: 36645R.S
UPC:
In Stock! Usually ships within 24 hours.
ASK A QUESTION View full details


36645R.S Coupler Replacement
Note: This repair will require removal of the unit from it's mounting hardware and repairs made on a bench or floor. Refer to your Owners manual and or installation poster for proper assembly and carefully read and understand all warnings and cautions pertaining to your model garage door opener.
Warning: Be sure electrical power has been disconnected from the input power lines prior to removing the motor cover of the garage door opener.
Warning: Any and all repairs made to this unit must be performed with the garage door disconnected from the garage door opener and with the garage door in the closed position.
1. Pull the Emergency release cord on the carriage to disengage the garage door opener if necessary. (If you are unable to lower the garage door using the garage door opener, use Extreme Caution manually closing the door. )
2. Unplug the power cord from the power receptacle.
3. Open lens cover by pressing the middle tab inward and remove the light bulbs. (FIGURE 1)

4. Remove the wall console and Safe-T-Beam wires from the terminal block located on side of opener (FIGURE 2). Use a small common screwdriver to press in on orange tabs while gently pulling wires from the block. Mark wires to help facilitate replacement.
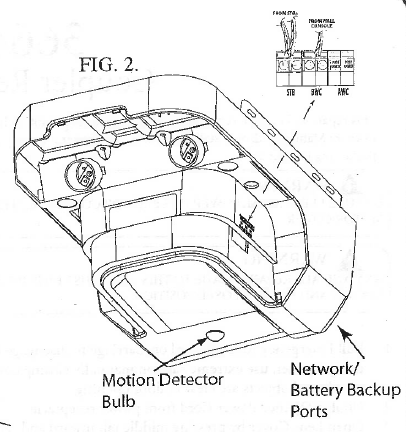
5. Remove network and battery backup harnesses from the front of opener (if applicable).
6. Remove the cotter pin & clevis from the door arm to separate door from the opener. (FIGURE 3).

7. Remove motor head and rail assembly from mounting brackets and set on a clean work surface or the floor.
Note: Be aware of the motion detector bulb on the bottom of the power head cover (on certain models). Do not set operator weight on this bulb. (FIGURE 2).
8. Remove the 6-7/16" self-tapping bolts from the rail/ motor mounting straps and pull rail from Motorhead. (FIGURE 4).

9. Install rail to motorhead assembly using the 36645R.S replacement coupler, mounting flange, and 6-7/16" self-tapping screws. (FIGURE 3).
Note: Motor shaft & rail shafts are different sizes. The coupler must be installed in the correct direction or the rail will not assemble to the motor shaft.
10. Reinstall the garage door opener assembly in reverse order as removed. Reference your owners manual or installation poster if needed.
11. Install Wall console and Safe-T-Beam wires back into the terminal block. Install battery backup and or network harness if applicable.
12. Install light bulbs and close lens cover.
13. Plug the garage door opener in.
14. Reprogram the limits controls per owners manual.
-

Free Shipping
We offer FREE shipping and handling on all orders that total over $17.99 and are shipped to a US address. All orders are shipped using UPS ground, directly from The Genie Company.
-

Genuine Replacements
Buying GENUINE Genie accessories and parts guarantees that you are getting quality OEM materials backed by a Genie warranty.
-

Support
Need assistance? We are here for you! We offer a wide range of customer support options including contact by phone or email, web chat services with a live agent, and a robust support section also located on our website. All customer care teams and services are based in the USA.
