
Published on: April 18, 2019
Do you have an older Genie legacy screw drive garage door opener that’s 10+ years old? Do you hear a loud chattering, or a skipping coming from the long screw drive rail assembly? Have you ever tried operating your garage door the motor runs, the screw drive turns, but the door doesn’t move? Do you remember a much more quiet garage door opener from when you originally installed it? If you have ever had any of these questions, maybe your carriage assembly is worn or stripped. Screw drive carriage you say? What’s that? The legacy screw drive carriage assembly is the black trolley mechanism that attaches to the garage door, and physically travels back and forth along the entire length of the screw drive rail assembly.
Our early style “legacy” Genie screw drive garage door openers, were designed with a screw that is in direct connection with the motor, for a direct drive system. But what does this mean? This means the screw and the motor are directly connected, which makes for less moving parts, and less wear and tear on the garage door openers motor pieces, unlike other drive systems that may have gears that can wear and break and are difficult to replace. Genie’s legacy screw drive garage door openers, (such as the Medallion Series, Direct Lift, 1st Gen Excelerator, IS/ISL/IC & H Series) were designed with safety and longevity. Replacement parts are low cost, easy to replace with the DIY homeowner in mind.
Sometimes as homeowners we have lots going on, work, kids, cleaning, the typical, but as far as maintaining our appliances, we often forget that there are regular maintenance care items that we should be performing to maintain the smooth operation and long life. That is why Genie’s legacy screw drive garage door openers, were made with a carriage assembly that is easy to replace to protect the heavy-duty rail system if there is an issue with the door, if the screw drive lubrication isn’t maintained, or if there are installation issues. Having a smaller part that may strip due to any of these makes for easy, quick replacement. Safety is key when it comes to the largest moving object in your home, and if a carriage is stripping or breaking this could be the result of a broken spring or improperly tensioned spring on the garage door. If this is the case, call a professional for repair and do not attempt to repair, replace or adjust. Find a Genie Dealer here.

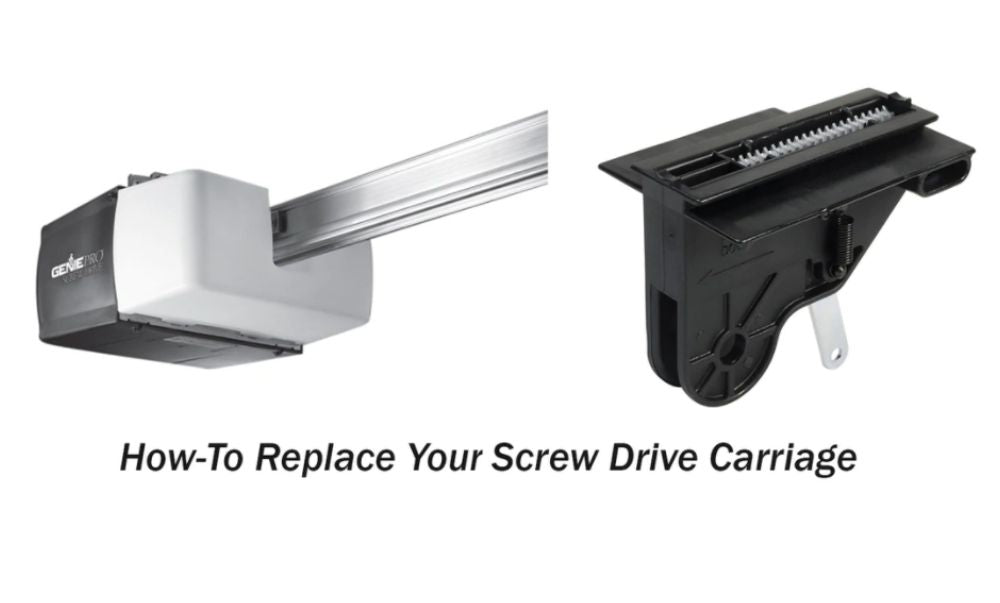
If the carriage is stripped, and there are no signs of installation errors, or door related errors, replacing the part is simple. *These instructions are only for those operators that look like the above images, with a carriage that looks like the below image**

First Step: With the door in the closed position, disengage the carriage by pulling the red emergency release cord. After pulling the cord, slide the carriage to about 6 inches from the end of the rail.
2nd Step: Pull the clevis pin and cotter pin, from the door arm that is attached to the carriage. Hold the door arm and do not let it fall against the door. Once the clevis and cotter pin are removed, slowly slide the door arm down toward the door.
3rd Step: Slide the carriage down closer to the door about 2 inches from the end. Remove the nut and bolt from the header bracket above the door. Hold the rail while doing so. (You may want to use a ladder to rest the rail on), or have a second person assist you.
4th Step. Slightly lift up on the rail, slide the carriage off. Slide the new carriage back on. Reattach the rail to the header bracket above the door with the nut and bolt.
5th Step: Reattach the door arm to the carriage reconnect with the clevis and cotter pins. After reattaching, re-engage carriage assembly.
This video shows how easy it can be done:
https://www.youtube.com/watch?v=sF4j7553Uz4&t=3s
Additional recommendations are to lubricate the screw drive with Genie screw drive lubricant. Make sure to perform monthly and yearly maintenance as per the instructions in your owners manual. Owner's manuals can be found here
37 comments
@Robert – https://store.geniecompany.com/collections/by-model-is-isl-series/products/screw-drive-carriage-assembly-with-magnet
You will need part 36179R.S.
I need the part number for screw caraige, model isl950/A
@Jandira-
https://store.geniecompany.com/collections/by-model-h4000-h6000/products/screw-drive-carriage-assembly-with-magnet
This will work for you.
I need to replace the carriage drive on my door opener. the model is 1/2 HP model H6000A
Would you recommend the right part number ?
@Roy -
Unfortunately without the actual model number we are unsure of what carriage will work. The numbers you provided are the manufacturing date. At that point in time we made multiple types of garage door openers that all used different carriage assemblies. If you look on the back of motor cover, or the top mounting plate under the white light cover you should be able to locate the model number