




The Genie Company
Safe-T-Beam® Garage Door Opener Safety Sensors
Safe-T-Beam® Garage Door Opener Safety Sensors
Couldn't load pickup availability
Genies Safe-T-Beam system is designed to ensure maximum safety for your garage door opener operation. Using an invisible infrared beam across the opening of the door, the Genie garage door safety sensor detects any object passing through the LED beam of light and automatically reverses the closing garage door, keeping children and pets safe.
If your Safe-T-Beam system has been damaged, a replacement kit is essential to continue safe operation of your garage door opener. This kit is compatible with Genie-only garage door openers manufactured since 1993 that use required safety beams.
Once installed, your replacement Safe-T-Beams are self-diagnostic and will alert you in the event of any malfunction. Don’t leave safety up to chance – replace your safety beams with this kit today.
- Replacement Kit. Replaces broken or faulty safety beams in your Genie garage door opener’s Safe-T-Beam system.
- Works with Many Genie Openers. Compatible with Genie (only) garage door openers manufactured since 1993 that utilize required safety beams.*
- Keeps Family and Pets Safe. Places an invisible infrared beam across the door opening and reverses door automatically if an object passes through the infrared beam of light.
- Self-Diagnostic. Alerts you of any malfunction in installation or operation, as an additional safety measure.
- Easy Installation. Replacement kit is easy to install, with mounting brackets and hardware included (does not include bell wire).
- Equivalent to Genie part numbers 37334R and 37220R
- Often Referred to as garage door opener- photo eyes, electric eyes, safety eyes, and safety sensors
- ⚠ California Residents: Proposition 65 WARNING
* Not compatible with Genie model 2040/2040L
UPC: 050049017514
SKU: 37220R
In Stock! Usually ships within 24 hours.
ASK A QUESTION View full details


PDF Installation instructions for installing the Safe-T-Beams
Installing the 37220R Replacement Safe-T-Beam System
1. IMPORTANT INFORMATION
WARNING
Moving Door can cause serious injury or death.
• Wall control must be mounted in sight of garage door, at least 5 feet above floor and clear of moving parts.
• Keep people clear of opening while door is moving.
• Do Not allow children to play with remote or door opener.
If Safety Reverse does not work properly:
• Close door, then disconnect opener using manual release handle.
• Do Not use remote or door opener.
• Refer to Door and Door Opener Owner’s Manuals before attempting any repairs.
Electrical Shock can cause serious injury or death.
• Power cord must be unplugged before attaching any wires.
• Be sure wire ends do not touch each other or other terminals.
If you have questions or if you need a manual, contact the distributor or manufacturer of the opener.
2. MOUNTING SOURCE & SENSOR
Locations of existing units can be reused if that is desired. Safe-T-Beam® System (STB) Source and Sensor do not have to be mounted on garage door frame. They can be placed anywhere along garage door wall that is convenient for mounting, provided the location meets the following requirements:
1) They must be placed across the door opening,
2) at the proper height,
3) with a clear line of sight between them. (Max. Range is 30 feet).
(They may be mounted on the floor, only as a last resort, if there is
no other option. Not recommended.)
1. To ease mounting, source and sensor units can be detached from the bracket by pulling them apart. After mounting brackets, slide units back onto brackets.

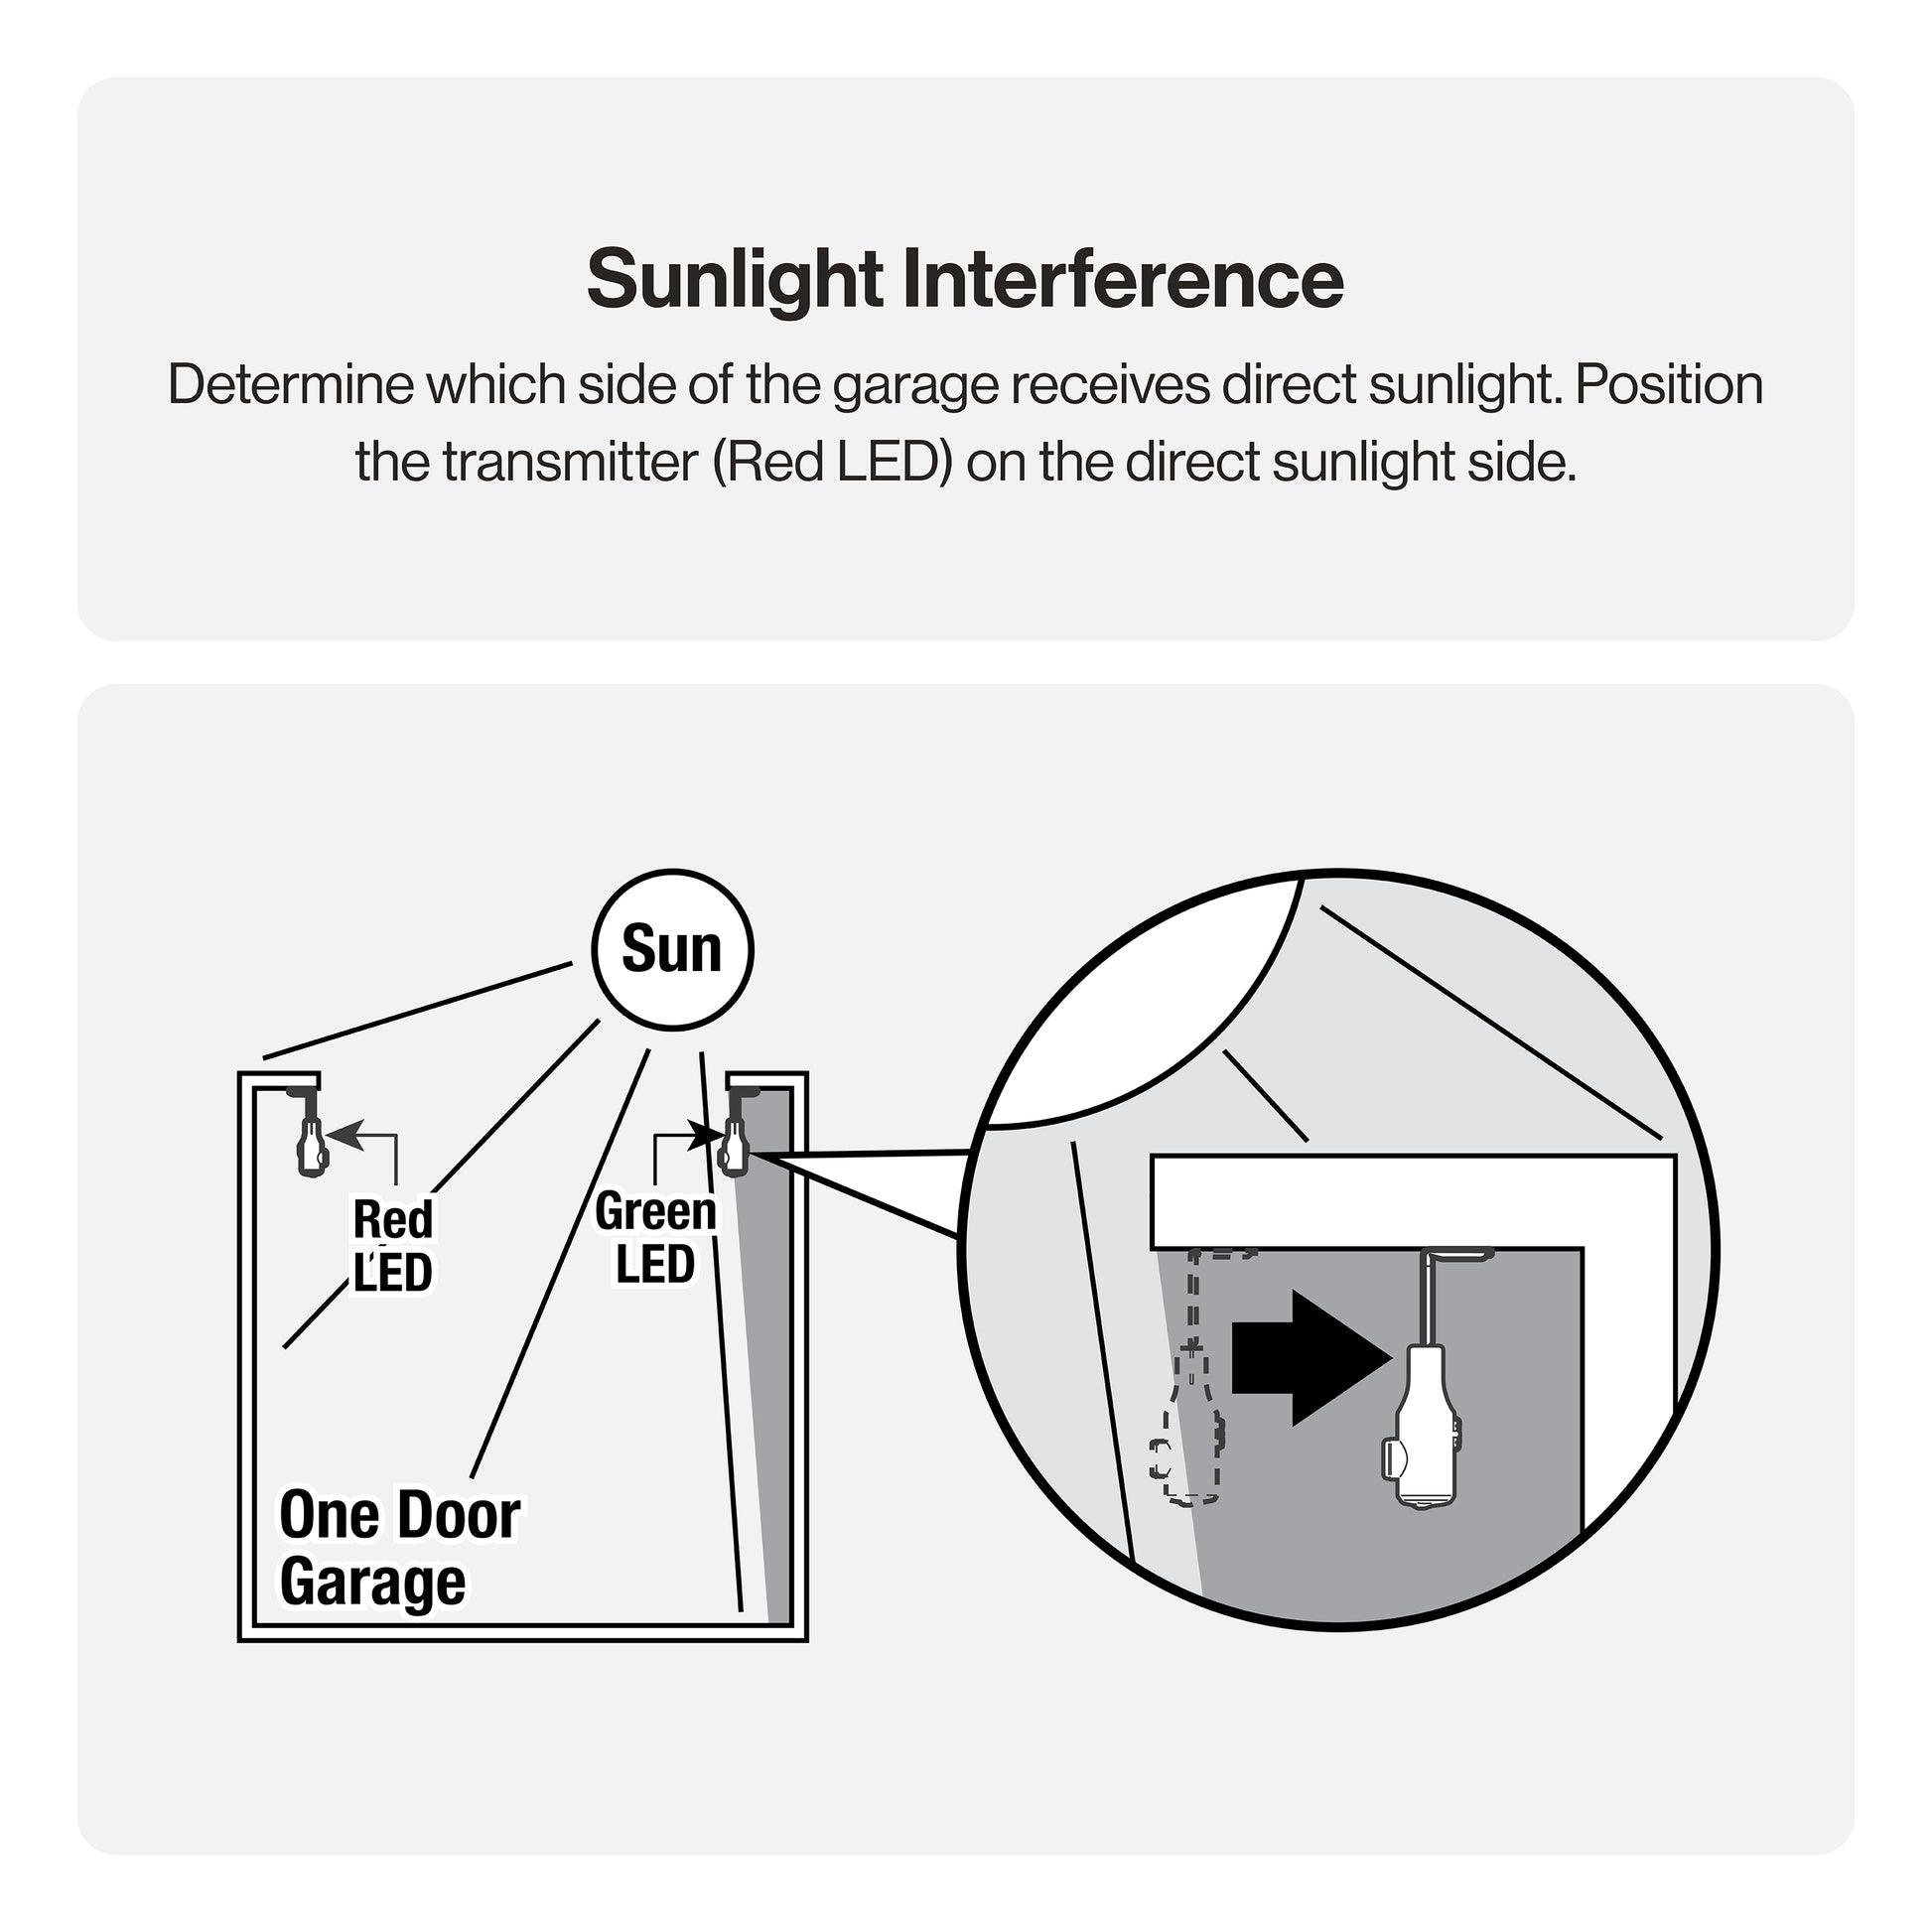
2. Ensure there will be an unobstructed path between source and sensor. Sensor should be mounted on the side of the garage door opening that receives the least direct sunlight.

3. Once the location is established, measure the height of bracket as shown. Hold the bracket in place and mark hole locations. 1/8" pilot holes are recommended.

*No height adjustment is needed for units mounted on floor.
3. WIRE RUN
Reuse of existing wiring is easiest and recommended unless it is broken, cut, frayed or there is a problem. If you can reuse existing wiring — SKIP FORWARD TO STEP 4. If new wiring must be installed, the path shown below is recommended.
1. Route two (2) lengths of two (2) conductor wire (See above) from opener, along top of rail.
Fasten wire to rail.
— Evenly space fasteners along rail.
Fasten to header and wall (preferably with insulated staples). Allow for some slack at the source and sensor units and cut off any excess wire.
CAUTION: When using insulated staples, be aware that staples which are too tight can cut or pinch wires. Cut or pinched wires can cause the Safe-T-Beam® System to stop working. When using insulated staples, make sure you fasten them only as tightly as needed to hold the wire snugly.
2. At source and sensor, route wires through bracket as shown and attach wires at terminals. Either wire to either terminal (non-polar).

3. If installing new wiring:
At opener, twist striped wires together. Twist plain wires together. Feed down through control wire tube “chimney” at top of opener.

4. Attach to terminals #1 and #2 (again either wire). Bundle excess wire and tape to top of power head.

4. SAFE-T-BEAM® SYSTEM TEST
Safe-T-Beam® System must be installed and working properly in order for door opener to function.
CAUTION: During testing of the Safe-T-Beam® System, be sure to stay clear of the door and any moving parts. It is preferable to use a long-handled object to interrupt the beam during tests.
1. Start door moving in close direction.
2. Pass an object through the path of the Safe-T-Beam® System in order to interrupt beam.
— Door should stop and reverse direction to fully open position.
If door will not run in closed direction, check for these or see chart below:
• Misalignment of Safe-T-Beam® System (Red LED on source unit will be blinking).
• Obstruction in path of beam.
• Pinched or broken wire.
• Loose wiring connection.
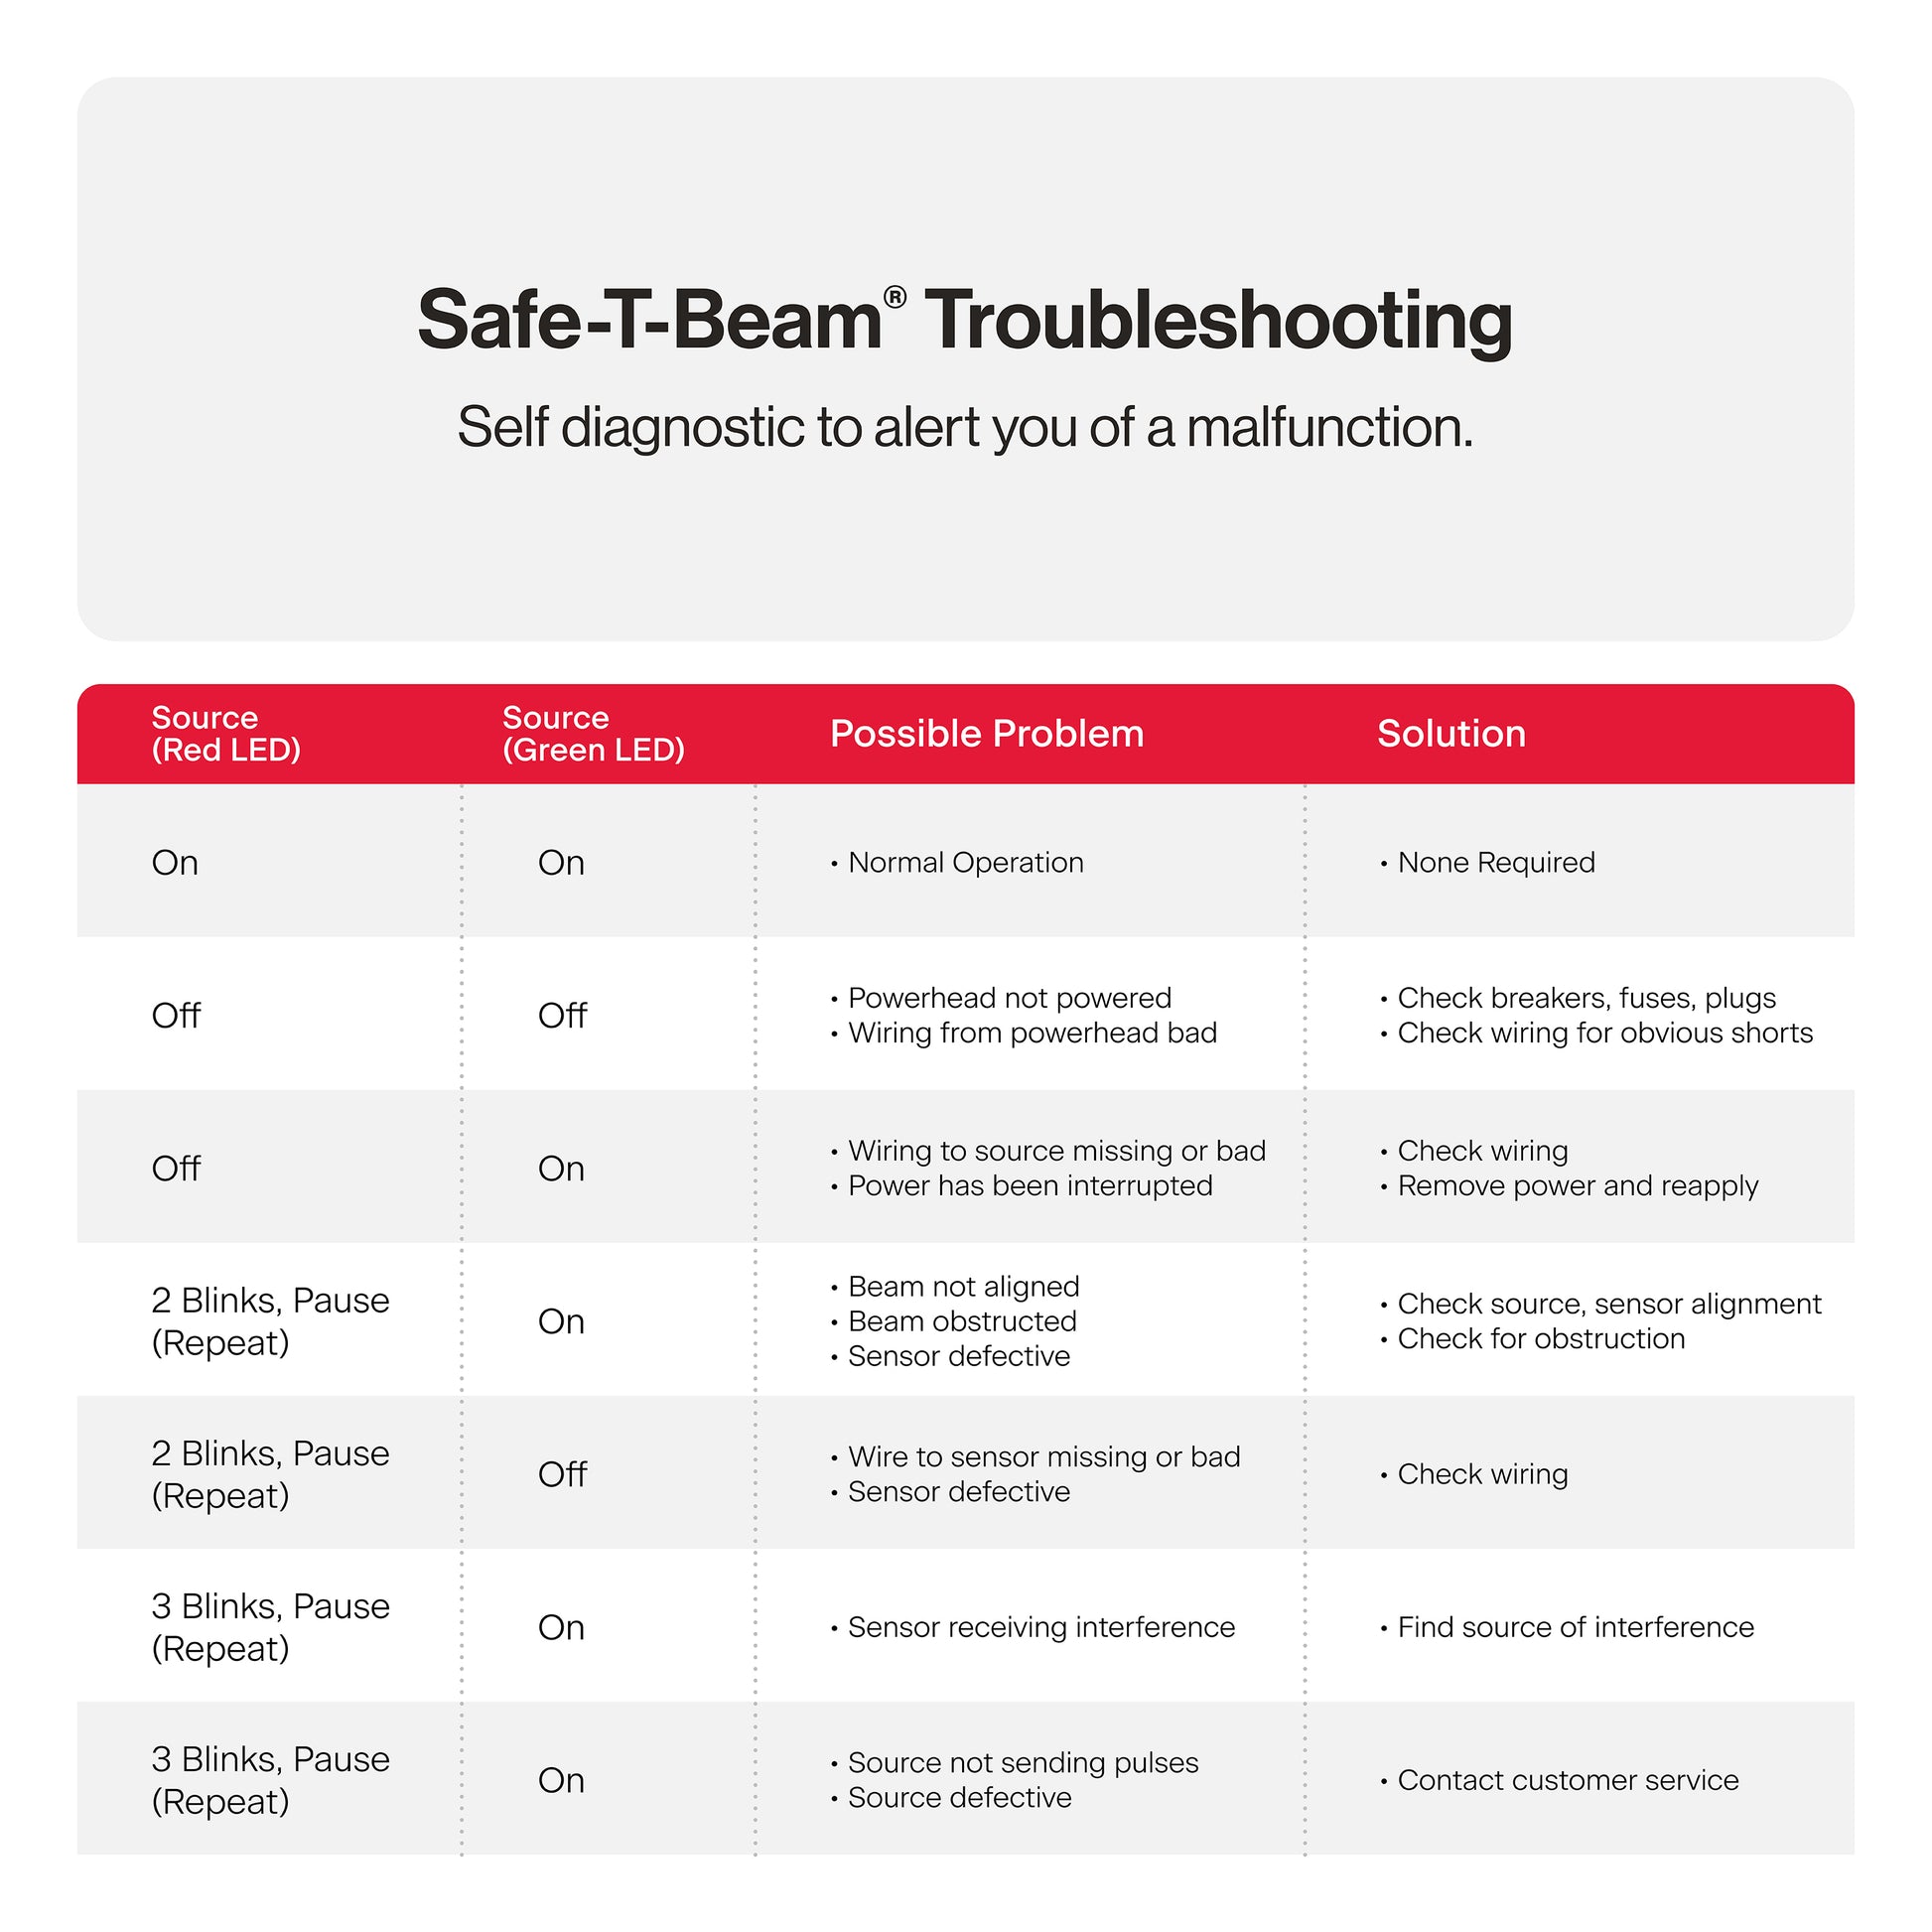
Genie Safe-T-Beam System Self Diagnostic Troubleshooting Tips:
| Source (RED LED) | Source (Green LED) | Possible Problem | Solution |
| ON | ON | Normal Operation | None Required |
| OFF | OFF |
•Powerhead not powered •Wiring from Powerhead bad |
•Check breakers, fuses, plugs •Check wiring for obvious shorts |
| OFF | ON |
•Wiring to source missing or bad •Power has been interrupted |
•Check Wiring •Remove power and reapply |
| 2 Blinks, Pause (Repeat) | ON |
•Beam not aligned •Beam obstructed •Sensor defective |
•Check Source, sensor alignment •Check for obstruction |
| 2 Blinks, Pause (Repeat) | OFF |
•Wire to sensor missing or bad •Sensor defective |
•Check Wiring |
| 3 Blinks, Pause (Repeat) | ON | •Sensor receiving interference | •Find source of interference |
| 4 Blinks, Pause (Repeat) | ON |
•Source not sending pulses •Source defective |
•Contact Customer service |

Safe-T-Beam technology uses a continuous infrared beam that projects across the interior of the garage door opening to a receiver at all times. In order for your garage door to operate, the beam must be located at least five inches, but no more than six inches, from the floor, and it should be aligned so that the sensors “see” each other. During closing, if the beam is interrupted by a person, animal or object, Safe-T-Beam automatically raises the garage door to protect whatever is in its path. Please note that the garage door opener will not close the door unless Safe-T-Beam® is installed and working properly.
ORDERING INFO:
To order wire use the following part numbers:
Safe-T-Beam wiring- part number 35265A.S and 35265B.S

-

Garage Safety
Genie Safe-T-Beams use an invisible infrared beam across the opening of the door to detect any object passing through the LED beam of light and automatically reverses the closing garage door.
-

Genuine Replacements
Buying GENUINE Genie accessories and parts guarantees that you are getting quality OEM materials backed by a Genie warranty.
-

Compatible
This Safe-T-Beam kit is compatible with Genie garage door openers manufactured since 1993 that use required safety beams. Easily replace broken or faulty beams with these Genuine Genie replacements.


