
38416A.S - Belt Sprocket Installation Instructions
38416A.S Belt Drive Sprocket Replacement Instructions
PDF Version of Instructions for replacing the 38416A.S Belt Sprocket
1. Pull the red emergency release cord on the carriage to disengage opener to close the garage door if it is open. (If you cannot lower the garage door using the opener, make sure to use extreme caution when manually closing door. Before pulling the emergency release cord, make sure people and objects are clear of the garage door opening.)
2. Unplug the garage door opener power cord from the power receptacle.
3. Open the light lens cover by pressing outer tabs on both sides of the motor and swing the lens cover down to remove light bulbs. Shown in FIG. 1.

4. Remove the wall console and Safe-T-Beam wires from the terminal block located on the rear of the garage door opener (Shown in FIG. 1A.) Use a small common screwdriver to press in on the orange tabs while gently pulling the wires out from the terminal block. Mark these wires to help facilitate replacement in later steps.
5. Remove the cotter pin & clevis from the garage door arm to separate the garage door from the garage door opener. Shown in FIG. 2.

6. Remove the powerhead and belt rail assembly from the mounting brackets and set the powerhead and rail on a clean work surface or on the floor.
7. Remove the 3-5/16” bolts from the belt rail to the motor mount to remove the rail. Shown in FIG. 3.

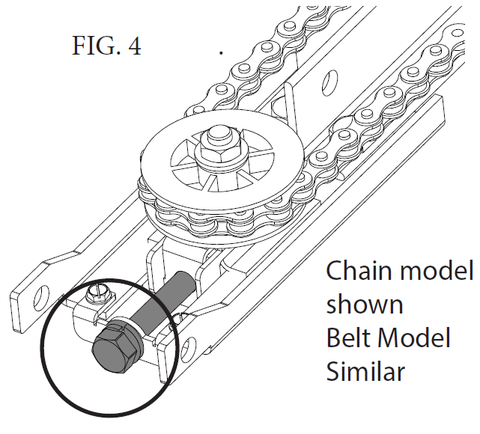
8. Loosen the 1/2” tension nut at the header end of the rail to create slack in the belt. Shown in FIG. 4.
9. Place a scrap block of wood under the belt sprocket assembly and drill out the rivets holding the belt sprocket bracket to the rail with a #7 (.201) drill bit.

10. Remove the screws from both the upper and lower brackets to separate the sprocket bracket assembly and remove the old sprocket.
11. Install the replacement sprocket 38416A.S, with bushing to lower bracket.
12. Wrap the belt around the replacement sprocket.

13. Install the sprocket guard and reinstall lower bracket screws.
14. Align the bushing into the upper bracket and assemble over the belt sprocket.
15. Reinstall the screws into the belt sprocket guard through upper bracket.
16. Use the supplied nuts and bolts to fasten the bracket assembly to the belt rail.
17. Tension the belt with the 1/2” tension nut. Shown above in FIG. 4.
NOTE: Refer to the owners manual for proper tension. (1/8” gap between belt and rail)
18. Assemble the belt rail back to the motor head. Shown above in FIG. 3.
19. Install the garage door operator to the mounting hardware. Refer to your owners manual for reassembly if necessary.
20. Reinstall the wall console and Safe-T-Beam wires. Shown above in FIG. 1.
21. Reinstall the Light Bulbs and close the lens cover(s) and rear cover. Shown above in FIG. 1.
22. Reattach the garage door arm to the carriage with clevis and hairpin. As shown in FIG. 2.
23. Move the garage door up or down to reengage carriage into the belt.
24. Refer to owners manual to reset up and down limits.
25. Perform complete safety check per owners manual.
-

Genie Garage Door Opener Replacement Parts
Common Garage Door Problems & the Parts That Fix Them Door won’t...
-

Accessories
[split] Find the right accessories for your garage door opener: The Genie...
-

Smart Device Compatible
Smart Device Compatible Garage "Can I make my garage door opener smart?"...


